8 Tips For Choosing Solar Panels For Outdoor Activity

by

06 September 2022

Energy

solar panels for outdoor

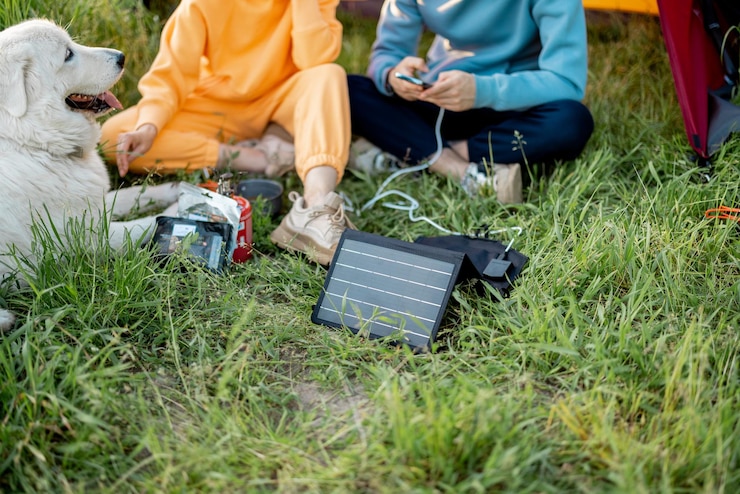
There is no need to carry your heavy, bulky generator anymore. With solar panels from the market, you can now find a way to have a hassle-free trip when you go out.

Solar panels for the outdoors are the best thing that you can bring along with you because they will be able to power up your devices while you are outdoors.

How To Select The Solar Panels For Outdoor Activity?

Solar panels are great for powering small devices like cell phones, GPS units, and hand-held radios. Solar panels can be used for camping, hiking, and other outdoor activities. The solar panels for outdoor activities must be able to withstand some rough handling. 

1. Choose The Right Size And Shape For Storage Ease

looking for solar panels

When you’re looking for solar panels for outdoor activity, the first thing you’ll want to consider is the size and shape of the panel. The most common size is 15 inches by 15 inches, but you can also find smaller and larger sizes. 

If you’re planning on using a solar panel in a backpack while camping, smaller size is easier to carry. However, a larger size may be needed if you plan to use the panel in a stationary location or on a boat. 

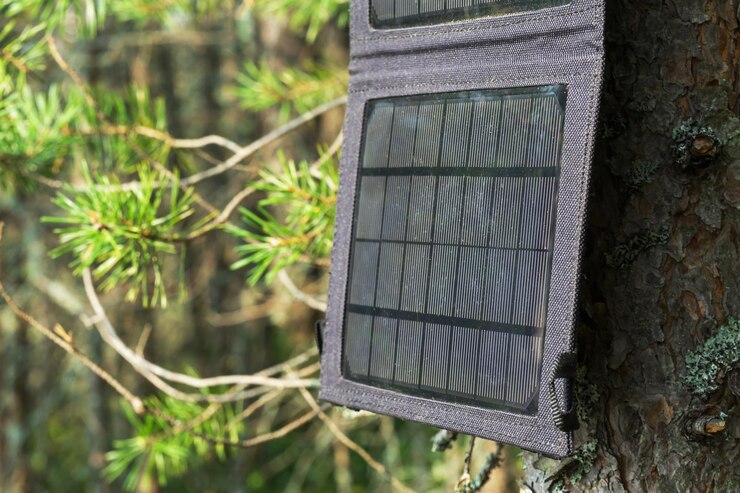
2. Get Flexible Solar Panels

When choosing a solar panel, you need to think about your situation and how you will use it. The solar panels for outdoor lights should always be flexible. Unless you are not going to select the portable one, you cannot get the full advantages.

For example, if you’re going to be camping, you want to make sure you get something that’s small, lightweight, and portable. Camping flexible solar panels at Sunyee are going to be the best option for outdoor activity.

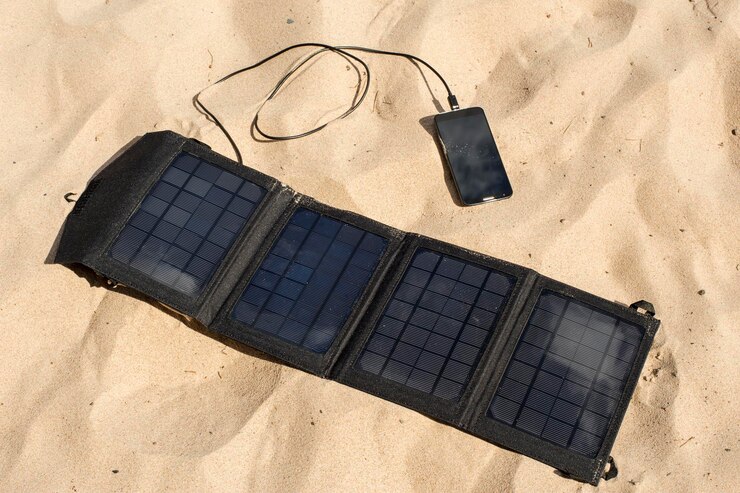
Flexible solar panels are the best choice for outdoor activity. The reason is that flexible solar panels are very light, strong, waterproof, and can be bendable to about 180 degrees. This is the coolest thing about flexible solar panels for the outdoors. In the past, you could only find rigid solar panels for sale. 

They were heavy, noticeable, and not very portable. Due to the advancement in technology, flexible solar panels are now made. They are very light, portable, and durable. The best part is that they can be folded and carried around easily. 

3. Understand The Different Types Of Portable Solar Panels

Portable Solar Panels

Just like any product, there are different types of portable solar panels to choose from. Each of these comes with its own set of advantages and disadvantages. 

Understanding them is the key to choosing the right one for your needs. The first thing which you should consider while selecting solar panels for outdoor and their capacity. 

This is measured in watts. The higher the capacity, the faster your gadgets will charge. The second thing to consider is the material used to make the panel. Generally, portable solar panels are made of silicon and aluminum. 

Each of these comes with its own pros and cons. Silicon panels are more expensive than aluminum panels but are also more durable. Aluminum panels are cheaper but are not as durable.

There are many different kinds of solar panels to choose from. You can choose between monocrystalline, polycrystalline, along with thin film solar panels.

Monocrystalline panels have higher energy efficiency with a lower amount of weight than polycrystalline panels. Thin film solar panels are the lightest, but they are also the least efficient. 

4. It Should Be Compatible With Your Electronics

Another thing you need to consider when choosing a solar panel is if it’s compatible with your electronics. There is a wide range of solar panels for outdoor available on the market, and each of them may be compatible with different electronics. 

If you own a smartphone or tablet that is not compatible with solar power, you can always buy one with a bigger capacity. Most solar panels are compatible with multiple devices; just remember to check the specifications before you buy one. 

5. Check How Long It Takes To Charge And Remains Without Charge

use a solar panel

If you are going to use a solar panel for outdoor activity, say camping, hiking, fishing, etc. The battery should be able to charge fully, which means at least 8 hours (for those with a low-capacity battery, it is better to bring a solar charger). 

But it is better to have solar panels outdoors that can remain at no charge for over a month, which means the battery should be at least 20,000mAh capacity. When purchasing replacement solar panels for outdoor lighting, the battery capacity is the first thing that you must check.

For example, small solar panels for outdoor lighting are more like a decorative part, so when you are starting to add these to your garden, you should always understand what the life span is and how long it will take to get the full charge.

6. Consider the price

Solar panels are a great option for powering outdoor gear and cutting down on the costs of outdoor activities. You can power all kinds of things with a solar panel. The biggest concern is being able to power what you actually want to power. 

You’ll need to know the wattage of the device before you can start looking for solar panels.

The cost of solar panels is one of the main concerns of people who want to install solar but are not sure if it is worth the investment. The price of solar panels and related equipment can put a big dent in your pocket. 

But it is also true that solar power is one of the most cost-effective ways to produce electricity. So, if you are planning to install solar panels outdoors, you have to decide how much you are willing to spend. 

7. Durability

solar panel durability

Durability is the first thing you need to consider when choosing solar panels outdoors. Solar panels are not cheap, and you don’t want to make a bad investment. It is very important to check the glass on the panel. It should be durable and thick, made of tempered glass that is scratch resistant and won’t crack under pressure. 

The glass needs to be strong enough to withstand wind and to keep the solar panel protected. The panel frame should have a good warranty and be sturdy, but most importantly, it should be made of rust-resistant material. 

It must be able to withstand the elements and keep the solar panel safe from rust. The whole frame needs to be strong, not just the legs. A good warranty is also very important, don’t settle for less than 25 years. 

8. Setting up

When choosing your solar panels for outdoor, the most important factor to consider is how easy it is to set up. If you are going to be using your solar panel for outdoor activity, it will most likely be set up in a place that is not easy to reach. 

You don’t want to be carrying a heavy solar panel with you while you are hiking or camping. It would help if you also were looking for a solar panel that is light enough to carry around your neck. There are a bunch of solar panels out there that are pretty much ready to go. Just unroll your solar panel and put it in the sunlight.

Wrapping It Up:

These are the qualities that you must check before selecting solar panels outdoors. Outdoor solar panels are not only user-friendly.

These solar panels are the ultimate solution for any place where frequent power cuts happen. Which types of quality do you match up with while selecting any outdoor solar panels? Let us know through the comment sections.

Read Also:

Arnab is a professional blogger, having an enormous interest in writing blogs and other jones of calligraphies. In terms of his professional commitments, He carries out sharing sentient blogs.

View all posts

Leave a Reply

Your email address will not be published. Required fields are marked *

Related

Safeguard Your Loved Ones Against the Dangers of Radon Gas

Radon Gas is one extremely harmful elements present in our environment that cannot be seen, is odorless and also tasteless. It is basically the end result of decaying uranium in the ground that ultimately takes the shape of gas and gets emitted into the air above the ground. Essentially, radon is harmless when it remains outdoors, but after seeping inside any construction it leaves a long-term negative impact. If the required preventive measures aren't taken, the gas gets accumulated at a dangerously high concentration. This radiation is actually the number one cause of lung cancer in the United States for nonsmokers. And overall, it ranks being the number 2 cause of lung cancer in Canada and the US. Therefore, you must protect your family and your loved ones against the terror of this deadly and unseen menace. Radon Testing Testing for radon, including both the DIY and professional support ways, is a pretty easy and straightforward process. 1. DIY Radon Gas Test Kits : The DIY radon gas kits used for short-term testing are charcoal-based where a canister collects the particles of radon present in the air of a particular environment. The exposure period usually ranges from 48 hours to 72 hours. While the kit does its job, you are supposed to follow a few important steps. While testing, make sure to keep all the doors and windows closed for as long as possible. This will allow the apparatus to get the most precise readings. In the end, the entire kit is sealed, a few forms are to be filled and then the user has to courier the complete package back to the (authentic) testing laboratory where the results will be compiled. All the accumulated radon particles will be tested by the experts and a detailed report will be prepared to be sent to the user. DIY Test Kits - Why Should You Buy? These kits are easily available online as well as offline stores. They are very much affordable and a user can test the concentrations himself. Such kits are ideal when you are doubtful about the situation but don't really want to invest a fortune into professional services. Exposure time is also manageable and at the end, you get expert suggestions about the circumstances. There's optimal accuracy maintained and that's what you may even long for! You must also know that if you get precise results only then it will benefit the whole situation.  Results that are achieved at the end form the basis for preventive measures that you might have to apply in case of higher concentrations. However, in case the levels appear safe and under the accepted levels, there's nothing else you will have to worry about. Electronic Radon Gas Detectors : These are electronic radon monitors that keep a check on the radon levels in your house. Such detectors are power or battery operated. The results are readily available, without wasting any time you can take the preventive measures and results too can be achieved on the spot. The hassle to courier a package and wait for the results gets avoided as the electric radon gas detector brings out precise readings right after the exposure time ends. Click here to know more about electronic radon monitors Electric Radon Gas Detection Monitors - Why Should You Buy? These devices administer only professional and advanced technology to help you keep the dangerous radon gas away. A radon detector can be useful in both home constructions as well as commercial properties. So, once you have the accurate results, you can take corrective steps to disperse the gas out of your property. On the basis of the readings you get, a radon mitigation plan is to be laid out for your home. And it is only in this manner that you become both an informed citizen of the nation along with being a responsible member of your family as well as the society. You will be able to take the next steps i.e. how to make your home radon-free! Radon Mitigation System When the test results report of any unsafe levels of radon gas inside your home, you will have to address the problem. In fact, address the problem as soon as possible. Contact a specialist or do it yourself if you are confident enough to be able to fix all the loopholes. However, an expert can actually help you in installing the right type of radon mitigation systems. A radon reduction system that cannot perform aptly is of no use. So, depending upon the kind of construction your home has, a multiple numbers of options will easily be made available by the professionals. The most prevalent option is the sub-slab depressurization along with sub-membrane depressurization. It is ideal for homes, basements as well as crawlspaces. 1.Sub Slab Depressurization Method : This method involves the drilling of a hole into the floor of your home's foundation and scooping underneath a slight cavity. A pump is then connected to this drilled out hole to vacuum radon gas before it can even break out and start causing harm to the members in the house. Even the other organic contaminants are pulled out from below to vent out the dangers present in your house. 2. Sub Membrane Depressurization Method : This method is actually similar to the method mentioned above. However, the only difference lies is in the membrane that is installed above the ground as opposed to a cavity being created in the other method.  In fact, the membrane is fitted right above the floor of the crawlspace, so the radon gas can easily be trapped and be vented out of the house. The gas is extracted out in a similar manner as above; there just isn't a slab but a membrane. One can consider any of the mentioned ways to get rid of radon gas from your home. But you'll have to ensure that radon must be released at a place where it will not cause any further damage to the people or animals. Radon mitigation isn't a one for all kind of treatment. And every house needs its own tailor-made preventive measures.  It may or may not be the job for a DIYer. From targeting the entry points of the radon gas to sealing all those spots, it is a pretty important process. One must have the needed skills, the absolute presence of mind and knowledge to ensure the safety of all the members in the family. If you aren't sure how to go about, contact any professional radon inspector. But, if you are knowledgeable enough to restrict the flow of gas in your property, then go ahead and save your loved ones. Read More : First Home Renovation Ideas And Tips What Are Renewable Sources And How To Introduce Them Into Your Household? Additional Ways To Keep Your Home Warm   Image Source: http://www.cancercarenews.ca/social-awareness/can-you-afford-to-ignore-radon-gas

READ MOREDetails
Vegetarian Diet

9 Magical Benefits of a Vegetarian Diet

No matter whether you don’t include meat into your diet because of ethics or you just don’t tolerate it, you follow a vegetarian diet. It’s highly beneficial if handled properly – with enough protein, healthy fats, carbs, and vital vitamins. If all the rules are followed, you’ll gain at least 9 benefits. Mood Improvement A vegetarian diet is usually not rich with arachidonic acid, which is found in animal products. It was discovered that this acid and mood swings are deeply connected, so the less of it you include into your diet, the better your mood becomes. Psoriasis Treatment Psoriasis is a serious problem for many people, as it affects the skin, making it red and irritated. It was noticed that the symptoms of psoriasis improved greatly in people who gave up on meat. Diabetes Symptoms Reduction Most vegetarian diets improve the health condition of people who have been affected by diabetes. Moreover, this kind of diets reduces the possibility of being affected by the condition. Eating legumes, like black beans , will greatly help in this case. Cataract Risk Reduction There’s a strong connection between what you eat and different diseases, including cataracts. It was noticed that people who don’t include meat in their diet have a lower risk of being affected by the disease in old age. Cholesterol Level Lowering A vegetarian diet helps lower cholesterol levels, mostly because of the absence of saturated fats. However, it’s important to include unsaturated fats that are stored in nuts, seeds, and legumes. To be sure you eat organic sources of unsaturated fat, but them at organic shops like FoodToLive.com. You’ll find many products you need in your diet, along with detailed descriptions of the contents of each product. You won’t have troubles with cholesterol in case you eat organic sources of fats and vitamins. Cardiovascular Disease Prevention Vegetarians eat lots of products high in vitamins and antioxidants. It means their bodies are cleaner, and most diseases don’t affect them. Cardiovascular disease is one of those, so if you follow a vegetarian diet, you won’t get atherosclerosis and your heart will be healthier. Obesity Prevention Vegetarians not only eat better food, but they also choose it more thoroughly, which eliminates the possibility of binge eating. It most often leads to rapid weight gain and obesity. Besides, plant-based foods are usually low in calories and high in nutrients, which contributes to your slim and healthy body. Read also: Tips to Lose Weight Naturally Kidney Stones Prevention Giving up on meat and switching to fresh plant-based foods will help you maintain a healthy urine pH. This is one of the main points of kidney stones prevention, as low pH leads to their formation. Nutritional Norms Following It was proved many times that a healthy vegetarian diet meets all nutritional requirements for any person of any age or way of life. Athletes get necessary proteins, infants get vital vitamins, and elderly get all nutrients necessary to support their bodies for longer. If you still think that vegetarians have a poor diet and they are always hungry only because they excluded meat from their meals, consider this question once more after looking at all the benefits of a vegetarian diet! References: globalhealingcenter.com/natural-health/9-health-benefits-of-a-vegetarian-diet/

READ MOREDetails
Solar Panel

10 Steps To Take To Set Up Solar Panels At Home

Solar panel has become increasingly popular in the past few years. This is partly driven by how environmentally friendly it is, although many people have noted how economical it can be too. Despite being a smart decision for lowering energy bills, potential users can be put off by its installation costs. This shouldn't be an issue, as installing solar panels at home can be much easier than people might expect. As long as you have some DIY electrical knowledge, then you should be able to install the panels yourself. As Gem Energy Brisbane Solar Power notes, there are a number of steps that you'll need to take when installing a solar panel at home. Steps To Take To Set Up Solar Panels At Home 1. Calculate Your Electrical Load: Before you decide on anything, you should calculate your current electrical usage. Once you've done so, you'll then be able to determine which solar panels and other parts you'll need. This is relatively simple to do, and often only requires a bit of math, plus an energy reading from your meter. 2. Battery Selection: Which battery you choose can be vital for your solar power. Naturally, the panels only generate electricity during the day, so you'll need to store some for the night. To do so, you should choose a high-quality one that provides a consistent amount of electricity over time. This will make it reliable when you're running several appliances during the evening. 3. Select Your Solar Panels: There are a considerable number of solar panels to choose from, which can be overwhelming. When you're deciding on one, you should look at its energy rating. This is typically determined based on set conditions, with some being more appropriate for certain weather. As a result, you should research how well a model will perform in your area. 4. Know Where To Place It: When you're considering a solar panel, you should determine where the best place on your property to put it is. There can be a few factors at play here, with access to sunlight being the most notable. The obvious place to install the panel is your roof, although you'll need to decide where to place it here. 5. Choose A Charge Controller: This is a device that's placed between your battery and solar panel and regulates the flow of electricity between the two. Choosing the right one can make a large difference, as it dictates how effectively your battery will charge. This means that you should spend a considerable amount of time picking one. 6. Pick The Right Inverter: Solar panels typically turn sunlight into alternating current (AC). However, most appliances function on direct current (DC). As such, you'll need to purchase an inverter, which switches from one to the other. There are a few types of inverters to choose from, each with its benefits. As such, you should spend time researching each. 7. Mount The Solar Panel: Once you have the equipment, it's now time to mount the solar panel. You can either create your own mounting mechanism or purchase a premade one. If you're not overly familiar with the process, then it's recommended that you buy a kit. When creating your own, be aware of the angle that you're mounting it at, as this will affect how much sunlight it receives. 8. Inverter & Battery Stand: Similar to the solar panel itself, you may need to build a stand to hold your battery and inverter. However, this isn't a complicated task, as you'll be able to make do with a box that includes a hole for the wiring. Once everything has been wired, it's important to note that you should cover this hole as much as possible to keep everything from being damaged. You should also ensure that it's kept away from running water. 9. Start Wiring: The wiring may be the most overwhelming part of the process, although it can be more straightforward than you think. Put simply, the connection should go from the solar panel to your charge converter to your load, i.e., your appliances. Alongside this, the charge controller should be connected to your battery, which should also be connected to your load. 10. Start Enjoying Your Solar Panel: Once you've connected everything in the appropriate manner, you can start enjoying your solar power. While setting everything up, you should ensure that you've done so in the right way. The wiring is the most important area here, so you should take care of it. Read Also: What You Should Know About Solar Energy For Schools: Benefits, Expectations, And More

READ MOREDetails